Big Idea or Enduring Question
How to pass lightning-input field value as a parameter to controller class method in Lightning Web Component?
Objectives:
After reading this blog, you’ll be able to:
- Understand what is lightning-input field and how to work with them
- Understand when to use querySelector vs querySelectorAll to access element
- Use custom data attribute to query or set the lwc component
- Pass lightning-input field value to lightning web component (lwc) controller
Business Use case
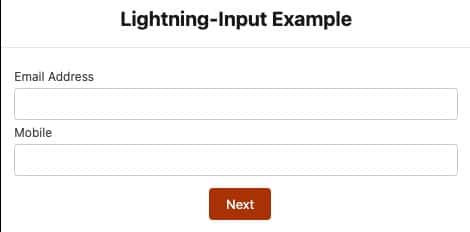
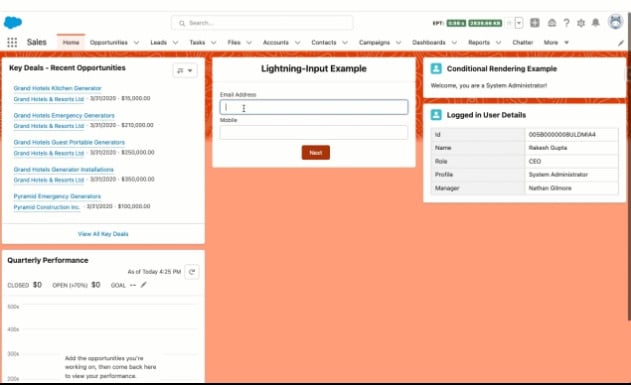
Godwin Mbah is working as a Developer at Salesforce innovate LLC. he just started learning the lightning web component and wondering if someone could help him understand how to build the following screen and pass email and mobile field values to the lwc JavaScript controller on a button (Next) click.

What is a lightning-input component?
The lightning-input component is used to create interactive forms in order to accept data from the user; a wide variety of types of input types and attributes are available, depending on the use cases. The lightning-input element is one of the most powerful and complex in all LWC components due to the sheer number of combinations of input types and attributes.
This component supports the following input types:
- checkbox
- checkbox-button
- date
- datetime
- time
- file
- password
- search
- tel
- url
- number
- text (default)
- toggle
Data attributes in Lightning Web Components
While working with a lightning web component, sometimes, we want to pass components’ values to JavaScript on a button click. You can do this in many ways, and data attribute is one of them.
For example, we are showing a form with few input fields. We want to pass entered values to the component JavaScript file on the button click. To achieve this, create the custom attributes by appending any string to data- and providing the information to it, like data-name, data-element, data-title, etc. Remember, you can only be able to enter string values to the data attributes.
<lightning-input
   type="email"
   data-element="user-input-email"
   label="Email Address">
</lightning-input>
Using querySelector and querySelectorAll
The querySelector() and querySelectorAll() are DOM APIs available on modern web browsers. They are used to query DOM elements that match a specified selector.
The difference between these two is that querySelector() returns a single element matching its selection criteria. querySelectorAll(), on the other hand, returns all elements matching the search criteria in an iterable list.
Syntax
this.template.querySelector('p'); // Selects first paragraph element in document
this.template.querySelectorAll('p'); // Selects all paragraph elements in document
this.template.querySelectorAll('[target]'); //Get all elements that contain the attribute target
So Here is How I will approach this:
Now you have a basic understanding of all ingredients we need to build the lightning web component for the given business requirement. Let’s get started.
lightningInputExample.js-meta.xml
A lightning web component can be used to build custom pages for Lightning Experience and the Salesforce mobile app quickly with point-and-click tools. Make sure to add the right target for it.
This configuration file makes the component available for all Lightning page types but restricts support on desktops.
<?xml version="1.0" encoding="UTF-8"?>
<LightningComponentBundle xmlns="http://soap.sforce.com/2006/04/metadata">
    <apiVersion>54.0</apiVersion>
    <isExposed>true</isExposed>
    <targets>
        <target>lightning__RecordPage</target>
        <target>lightning__AppPage</target>
        <target>lightning__HomePage</target>
    </targets>
</LightningComponentBundle>
lightningInputExample.html
Every UI component must have an HTML file with the root tag <template>. The template contains two lightning-input tags that create input for email and mobile. The template includes one lightning-button (Next) with the onclick method handleNext.
It is possible to use data-element attributes in the lightning-input component to pass email and mobile details to javascript for further logic. But we will use onchange event and store the values in variables in LWC controller.
When a user clicks on the Next button, it will call a JavaScript method handleNext() which will usevariablesto get the email and mobile field values.
<!-- lighntingInputExample.html -->
<template>
    <form>
        <div
            class="slds-p-top_small slds-p-bottom_medium slds-align_absolute-center slds-theme_default slds-text-heading_medium">
            <b>Lightning-Input Example</b></div>
        <div class="slds-box slds-theme_default">
            <lightning-input
                    type="email"
                    label="Email Address"
                    value={emailvalue}
                    onchange={handleEmailChange}>
            </lightning-input>
            <lightning-input
                    type="tel"
                    name="mobile"
                    label="Mobile"
                    value={mobilevalue}
                    onchange={handleMobileChange}>
            </lightning-input>
            <div class="slds-m-top_small slds-align_absolute-center">
                <lightning-button
                    variant="Neutral"
                    label="Cancel"
                    class="slds-m-left_x-small"
                    onclick={handleCancel}>
                </lightning-button>
                <lightning-button
                    variant="brand"
                    class="slds-m-left_x-small"
                    label="Next"
                    onclick={handleNext}>
                </lightning-button>
            </div>
        </div>
    </form>
</template>
lightningInputExample.js
Use variables from LWC controller to get the email and Mobile values. The alert will display the value of email and mobile when clicking on the Next button.
import { LightningElement } from 'lwc';

export default class InputExample extends LightningElement() {

    emailvalue ="username@example.com";
    mobilevalue= "000-000-0000";

    handleEmailChange(event){
        this.emailvalue = event.target.value;
    }

    handleMobileChange(event){
        this.mobilevalue = event.target.value;
    }

    handleNext() {

        alert('email '+ this.emailvalue);
        alert('Mobile '+ this.mobilevalue);

    }
}
Proof of Concept


One reply on “Pass lightning-input field Value from a Button Click to LWC Controller”
Godwin Mbah October 27, 2021 at 3:34 pm
I am a Certified Salesforce Developer, Consultant, Platform App builder & Advanced
Administrator based in Dubai and the UK with more than 5 years of experience in full Salesforce
implementation and business process automation. I have extensive
knowledge in design, business logic automation, developing, Security,
integrating, and maintaining high-quality Salesforce software solutions. I am a freelancer and open to working on projects ranging from small projects to long-term contracts.